Introduction: The Importance of Headers in Electronics
If you want a robust, modular and reliable connection on your pcb board, choose the right PCB head is essential. The head is the core of every modular system, used to connect board or module, interface circuit, and achieve easy testing, troubleshoot and upgrade. In this ultimate guide to PCB head, you will gain a comprehensive understanding of different type of head, how they are used, and how to choose the right PCB head for your application, whether you are designing consumer electronic, industrial controller, or embedded system.
Understanding PCB Headers: Guide to Pin Headers and Connectors
What Is a PCB Header?

A PCB header (or pin terminal) are electrical connector composed of row of metal pin, used to connect two parts of a circuit, whether it is PCB-to-PCB, PCB-to-wire, or board-to-module. Pin head are usually composed of one or more row of pin, with a standard pin spacing between each row (typically 2.54 millimeter or 0.1 inches). They can be soldered onto the PCB through through-hole (through-hole heads) on the PCB, or directly installed on the surface of the circuit board (surface mount head).
A guide to pin headers always starts with the basics:
- A header may be straight or right-angled, shrouded or non-shrouded, single row or multiple row.
- Header can be either male (exposed pins) or female (sockets).
- Headers are often used as a modular, replaceable bridge for transferring power, data, or signal.
Anatomy of a Pin Header
| Feature | Description |
| Pin Material | Usually copper alloy, plated with gold or tin for performance |
| Housing | Plastic for isolation and mechanical support |
| Rows of Pins | Single-row headers, dual-row, and more for different densities |
| Pin Pitch | Distance between each pin, determining connector compatibility |
| Mounting Style | Through-hole or surface-mount depending on assembly needs |
Why Use PCB Headers? Benefits for Modern Electronics

Modular Connectivity
Header are usually the preferred solution for modular PCB designs. Because header can determine or undermine the reusability of circuit board, modern electronic designer rely on single-line and multi-line header to expand card, test header and debug interface. This modularization is key to development board such as Arduino or Raspberry PI, where additional modules (shields or caps) are connected using standard pin header connector.
Rapid Prototyping & Debugging
By using the PCB header, you can quickly prototype the circuit section, change sensor or access test point during PCB debugging and programming. Many development kit come with through-hole heads pre-install for this purpose.
Mechanical and Electrical Advantages
- Safety Electrical Connection: High-quality PCB headers provide reliable, low-resistance contact for signal and power transmission.
- Vibration Resistance: Ruggedized headers with lock mechanism or shrouding are used in automotive or industrial application.
- Serviceability: Faulty subassemblies or expansion module can be replaced easily if the header is securely soldered onto a printed circuit board.
Types of Pin Headers: A Complete Guide

When it comes to types of pin headers, the choices you make directly impact your design’s success and serviceability. Here’s a comprehensive guide:
By Orientation
- Straight Headers (Vertical): The most common — pins stick straight up from the board, perfect for stacking modules.
- Right-Angle Headers: Pins bend at 90º, ideal for connections at the side of the board or for edge connections in compact layouts.
By Rows
- Single-Row Headers: Save PCB real estate. Used for data lines, jumpers, or single bus connections.
- Multi-Row Headers: For higher pin density compared to single row, supporting complex modules or multiple signal types.
By Housing/Shielding
- Shrouded Headers (Box Headers): Feature a plastic enclosure for keying (preventing incorrect mating and providing strain relief).
- Non-Shrouded Headers: Exposed pins, inexpensive, but can be plugged in backwards by accident.
By Pin Type
- Machine Pin Headers: Precision pins with tighter tolerances and superior contact stability; best for high-reliability/professional PCB applications.
- Standard Pin Headers: Stamped pins for general purpose, cost-effective use.
- Stackable Pin Headers: Extra-long pins for “stacking” boards or shields (common in Arduino systems).
By Mounting
- Through-Hole Headers: Pins go through holes in the PCB and are soldered on the bottom side of the board, giving strong mechanical bonds.
- Surface Mount Headers: Soldered directly onto the surface of the PCB with SMT pads.
By Special Function
- Locking Headers: Built-in clips or friction notches for resisting accidental unplugging (used in automotive/industrial).
- Waterproof Headers: Sealed for outdoor or harsh environment use.
Surface-Mount Headers vs. Through-Hole Headers
Through-Hole Headers Explained
Through-hole headers are best when you need extra mechanical strength—e.g., rugged use, frequent plugging/unplugging, or large wiring harnesses in automotive or power-industrial applications. The pins go through the PCB board, with each pin soldered onto the bottom side of the board (in a footprint called a plated through-hole). These are often used in “professional PCB” assemblies or when vibration resistance is needed.
Surface Mount Headers Explained
Surface mount headers (also called surface-mount headers or SMT headers) sit right on the top side of the PCB and are soldered without passing through the PCB. Surface mount headers are best for high-speed automated assembly, compact layouts, and miniaturized electronics. The absence of holes in the PCB for these headers allows for more efficient routing of traces and is advantageous when both sides of the board are densely populated.
Table: Through-Hole vs. Surface Mount Headers
| Feature | Through-Hole Headers | Surface-Mount Headers |
| Mechanical Strength | Superior | Moderate |
| Assembly | Manual, slower | Automated, faster |
| PCB Real Estate | Takes space on both sides | Conserves PCB space |
| Vibration Resistance | Excellent | Good for smaller connectors |
| Preferred For | Rugged/industrial | Compact/consumer electronics |
Important Specifications When Choosing PCB Headers

Pin Pitch and Pin Density
- Pin pitch refers to the spacing between adjacent pins. Common pitches: 2.54mm, 2.00mm, 1.27mm, and even down to 1.0mm for dense layout.
- High-density header are best for applications needing many signals in a small footprint, but check for PCB fabrication limit.
Current Rating
- Know how much current each pin can safely carry. For power or motor line, select a type of connector that exceed the total expected current with a 25% margin.
- Machine pin header and thick pins excel for power delivery; thin, densely packed header are more suited to low-current data and control signal. Always consult the datasheet for each header connector to confirm the maximum current each pin can safely handle.
Voltage Rating and Insulation
- Voltage rating is crucial in designs where headers must handle different ground potential or high-voltage signal. This prevents arcing or insulation failure, especially in power supply circuits or industrial interface.
- Choose headers with insulation material rated for your application: PBT and polyamide (e.g., PA6T/PA9T) are common for their high heat and chemical resistance.
Durability and Mating Cycles
- Many header are rated for a specific number of insertion and removal cycle—some as few as 50, others (especially machine pin headers) rated for over 1,000 cycles.
- For debug, programming, or test points (which get connected/disconnected often), gold-plated header are recommended for longevity.
Temperature Range
- Electronics in automotive or industrial control systems may face extreme temperature. Only high-quality PCB header specified for such range (e.g., -40°C to +150°C) should be used in these environment.
Headers Explained: Table of Key Specs
| Specification | Key Points/Newbie Tips |
| Pin Pitch | Must match socket/cable; tighter for compact devices |
| Current Rating | Safety margin >25% |
| Voltage Rating | Avoid arc-overs; match for insulation |
| Plating | Gold for frequent cycles/high signal integrity; tin for budget |
| Mating Cycles | Higher cycles needed at test/debug points |
| Housing Material | PBT/PA9T for high temp; PA66 for most applications |
| Operating Temp | Especially important for automotive/industrial |
Applications: Using PCB Headers in Electronic Devices
PCB header are used across almost every sector of electronic. Here’s how header are used in varied devices and environment:
Consumer Electronics & Embedded Devices
- Single-board computers (Raspberry Pi, BeagleBone) rely on dual-row 2.54mm headers for GPIO expansion, sensors, and modular add-ons.
- In wearable and portable devices, miniaturized surface mount headers serve as battery, sensor, or programming interfaces, with header placed at the side of the board for quick access.
Industrial & Automotive
- Harsh environment demand vibration-resistant header—press-fit, shrouded, or locking types are the norm.
- Automotive ECUs frequently use waterproof header for wiring harness connection – keeping signal and power integrity intact even under the hood.
Robotics & Prototyping
- Modular connection systems using stackable header make it easy to connect different “layer” of circuit boards—motor, sensor, communication, or power supply module.
- Rapid PCB prototyping platform (e.g., Adafruit, SparkFun) offer breakaway pin header to solder onto the PCB or breadboard for custom project.
Table: Common Applications of Different Types of Pin Headers
| Header Type | Application Examples |
| Through-hole, Single-row | Basic sensor interface, power input |
| Surface mount, Dual-row | Microcontroller breakout boards, mounting shields and modules |
| Locking, Shrouded | Automotive harnesses, industrial robots |
| Stackable | Arduino shields, expansion stacks |
| Machine pin | High-reliability modules, test sockets |
| Waterproof | Outdoor sensors, automotive ECUs |
How to Choose the Right PCB Header for Your Project

Choosing the right PCB header isn’t just about plugging thing together—it’s about ensuring future-proof, reliable, and serviceable modular electronic. Here’s a complete guide to make the process easy:
1. Map Out Your Circuit and Signals
- Identify which system part need to connect via headers: signal, power, debug, programm, or expansion.
- Plan pin map and group ground/power pins to minimize noise and maximize signal integrity.
2. Decide on Board-to-Board or Board-to-Cable
- Board-to-board use typically benefit from straight or right-angle dual-row headers for pin density.
- For cables (sensor/actuator harness), select shrouded or locking header.
3. Verify Pitch and Pin Count
- Ensure pin spacing match both your PCB layout and any plug or sockets on other modules or cable.
- Leave extra pin for future feature (“future-proofing” your PCB board).
4. Assess Environment and Use Case
- Rugged/industrial = shrouded, locking, or waterproof header.
- Debug/prototyping = gold-plated machine pin header for many cycle.
- Compact devices = surface mount, low-profile type.
5. Align with Assembly and Testing Plans
- For high-volume manufacture, pick headers compatible with automated soldering and inspection system.
- If in-circuit testing is planned, expose tester points via accessible header on the edge or side of the board.
Table: Header Types and Best-Fit Applications
| Application | Best Header Type | Why? |
| Debug & Programming | Gold-plated, machine pin | Repeated cycles, reliable signal |
| Power Connectors | High-current, press-fit, through-hole | Mechanical strength, safety margin |
| Board Expansion | Stackable, dual-row | Adds rows for future features |
| Automotive/Outdoor | Locking, shrouded, waterproof | Shock, dust, and moisture proof |
Best Practices for PCB Assembly with Pin Headers
Placement and Footprint
- Always place the header where it is easily accessible, especially for test points or expansion modules on a printed circuit board.
- Use silkscreen labels for orientation—clearly mark pin 1. A misconnected header can result in short circuits or device failure.
Soldering and Mechanical Security
- For through-hole headers, ensure solder completely fills each hole and flows to the bottom side of the board for the strongest joint.
- Surface mount headers require reflow soldering using high-quality solder paste—avoid cold or dry joints.
- For headers under mechanical stress, consider reinforcing with additional anchoring holes or solder-filled vias.
Handling Multiple Header Types
- Combine surface-mount header with through-hole power connectors on the same PCB when space and robustness are both priorities.
- For prototype, use breakaway pin headers that can be snapped to the required length.
Troubleshooting and Maintaining Your Headers
Common Problems
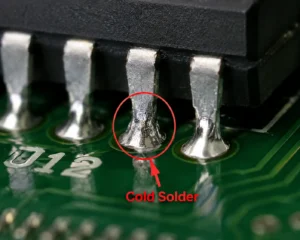
- Cold Joints: If the header joint look dull or cracked, reflow with fresh solder.
- Pin Misalignment: Gently correct with needle-nose plier; if severe, desolder and reseat to avoid bent or shorted pins.
- Contact Wear: On high-cycle header, gold plating resist oxidation; if contact resistance rise, gently clean with isotropic alcohol or a fiber brush.
Preventing Header Failures
- Never yank cables perpendicular to the header—always grip the connector house.
- Inspect solder joint under magnification for hairline crack, especially after mechanical strain or vibration.
Maintenance Tips
- For field device, apply a light film of contact lubricant to exposed header (where recommended) to preserve electrical connection in damp or corrosive environment.
- Store spare and unused header in dry, dust-free container to prevent tarnish or corrosion on exposed pin.
Headers Explained: PCB Header FAQs
Why are some headers gold-plated and others tin-plated?
Gold resist corrosion for reliable signal contact, while tin is more economical for power or non-critical signal.
What is the best way to add a header to an existing board?
Use through-hole pin for mechanical strength, align with the PCB’s labeled footprint, and solder from the bottom side of the board.
Can I use headers for both power and signal?
Yes, but be sure to check the current each pin can safely carry and provide enough ground return near high-current line.
Do I need a shrouded/locking header?
If your application is subject to vibration, potential assembly error, or needs field maintenance, shrouded or locking headers are highly recommended.
Is there a standard for how far a header should stick out from the PCB?
It depends on the mating connector depth; most pin header connectors are 6mm to 12mm above PCB, but always match to your enclosure and connector stack-up.
Conclusion: Choose the Right One for Your PCB Board
As this ultimate guide to PCB header has shown, the right pin header depends on your PCB’s specific needs: mechanical stress, mating cycles, pitch, current, signal type, and assembly technique. Header are often the unsung heroes of electronic device, but the appropriate PCB header can dramatically improve the serviceability, modularity, and professional feel of your project.
A header may look simple, but on a printed circuit board it determine much more than just connectivity—it’s the foundation for reliable, safe, and scalable electronic.
Make header selection a thoughtful part of your PCB design process and use this comprehensive guide as your reference for all future projects.