

Introduction to Cold Solder Joints
In electronic manufacturing, repair, and DIY PCB assembly, the importance of soldering cannot be overstated. At the heart of every reliable electrical connection are PCB solder joints—vital for conducting electricity and physically securing components to a PCB board. Among the most notorious and problematic failures is the cold solder joint or “cold soldering fault,” a hidden defect that often escapes quick visual inspection but causes inexplicable device failures.
A cold solder joint forms when solder does not melt completely, creating a poor or unreliable connection sometimes called a “weak solder condition.” This article will take you through everything you need to know about cold solder joints: from their formation and characteristics, to expert detection, repair, and methods to prevent cold solder in all your electronics projects.
What Are Cold Solder Joints and Why Do They Matter?
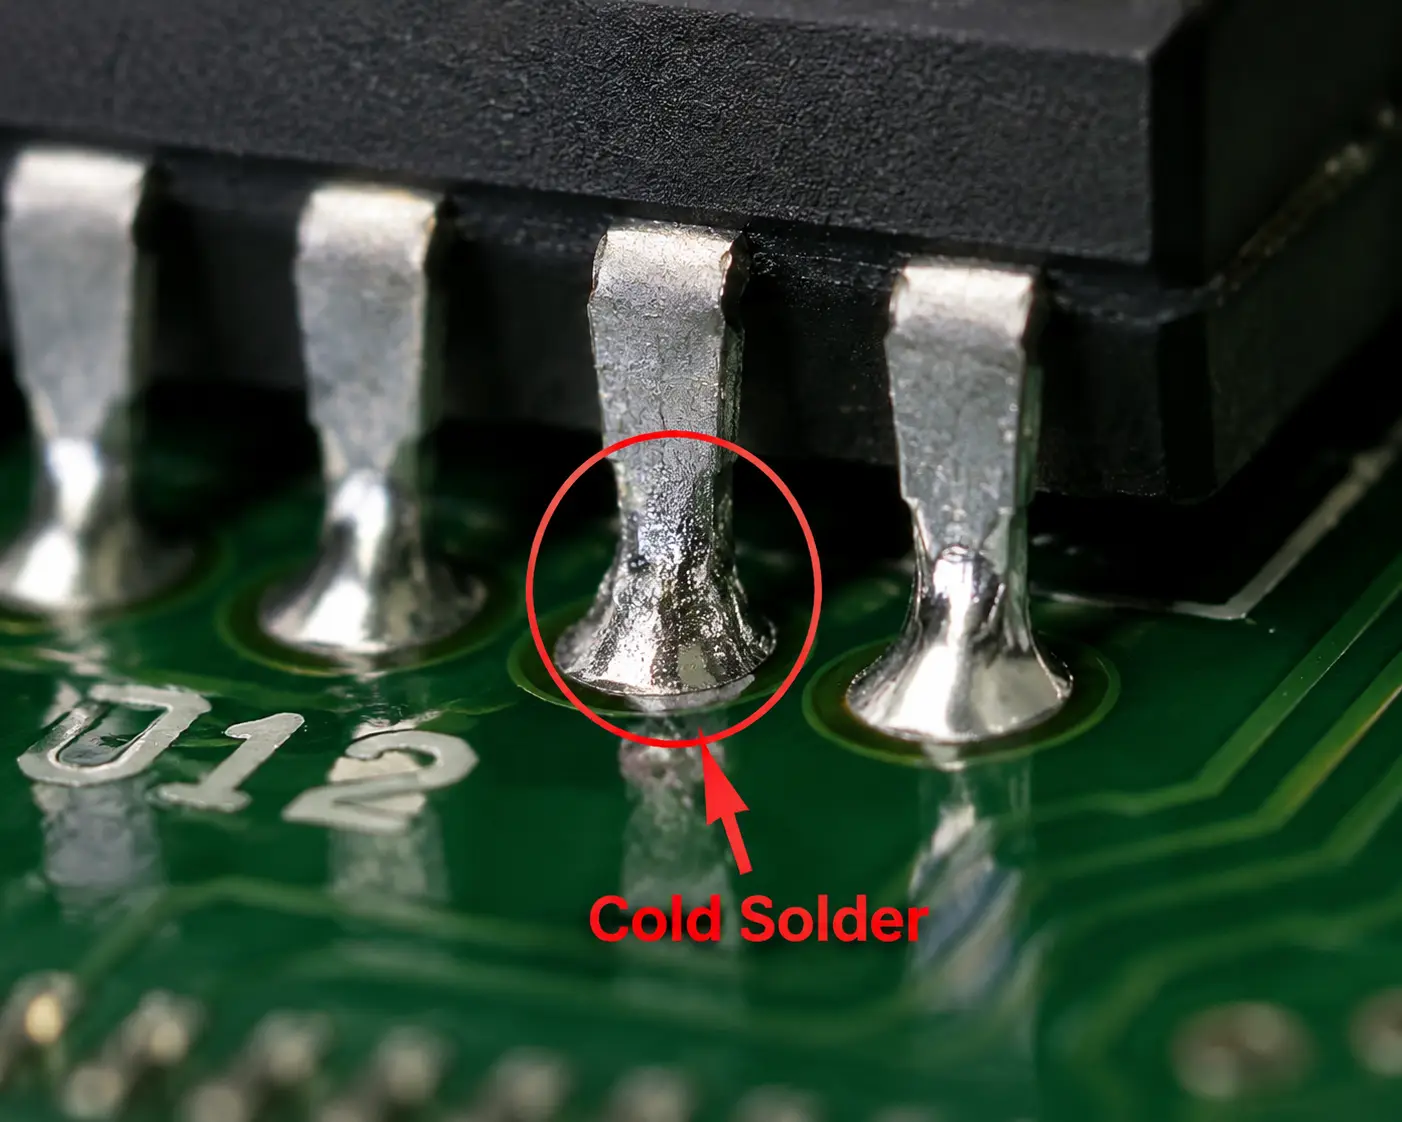
A cold solder joint—known as cold solder or a cold solder connection—is a faulty solder joint where the solder does not melt properly to form a strong, electrically conductive junction between the lead and the PCB pad. This usually leads to high resistance, weak mechanical adherence, and random circuit failure. Cold soldering is not only the bane of electronics repair but also a critical quality concern in PCB fabrication.
Why Do Cold Solder Joints Matter?
- Unreliable Electronics: A cold solder joint may cause random device reboots, lost signals, or outright failure—even if the electronics initially pass inspection.
- Safety Hazards: In power or automotive PCB assembly, the effects of cold solder joints can include short circuits, overheating, and even fire.
- Expensive Recalls: Mass manufacturers may face costly product recalls due to undetected cold solder junctions.
- Hard to Diagnose: Because a cold solder connection is often intermittent, it can take hours to locate root causes of cold solder when troubleshooting.
Characteristics of Cold Solder Joints
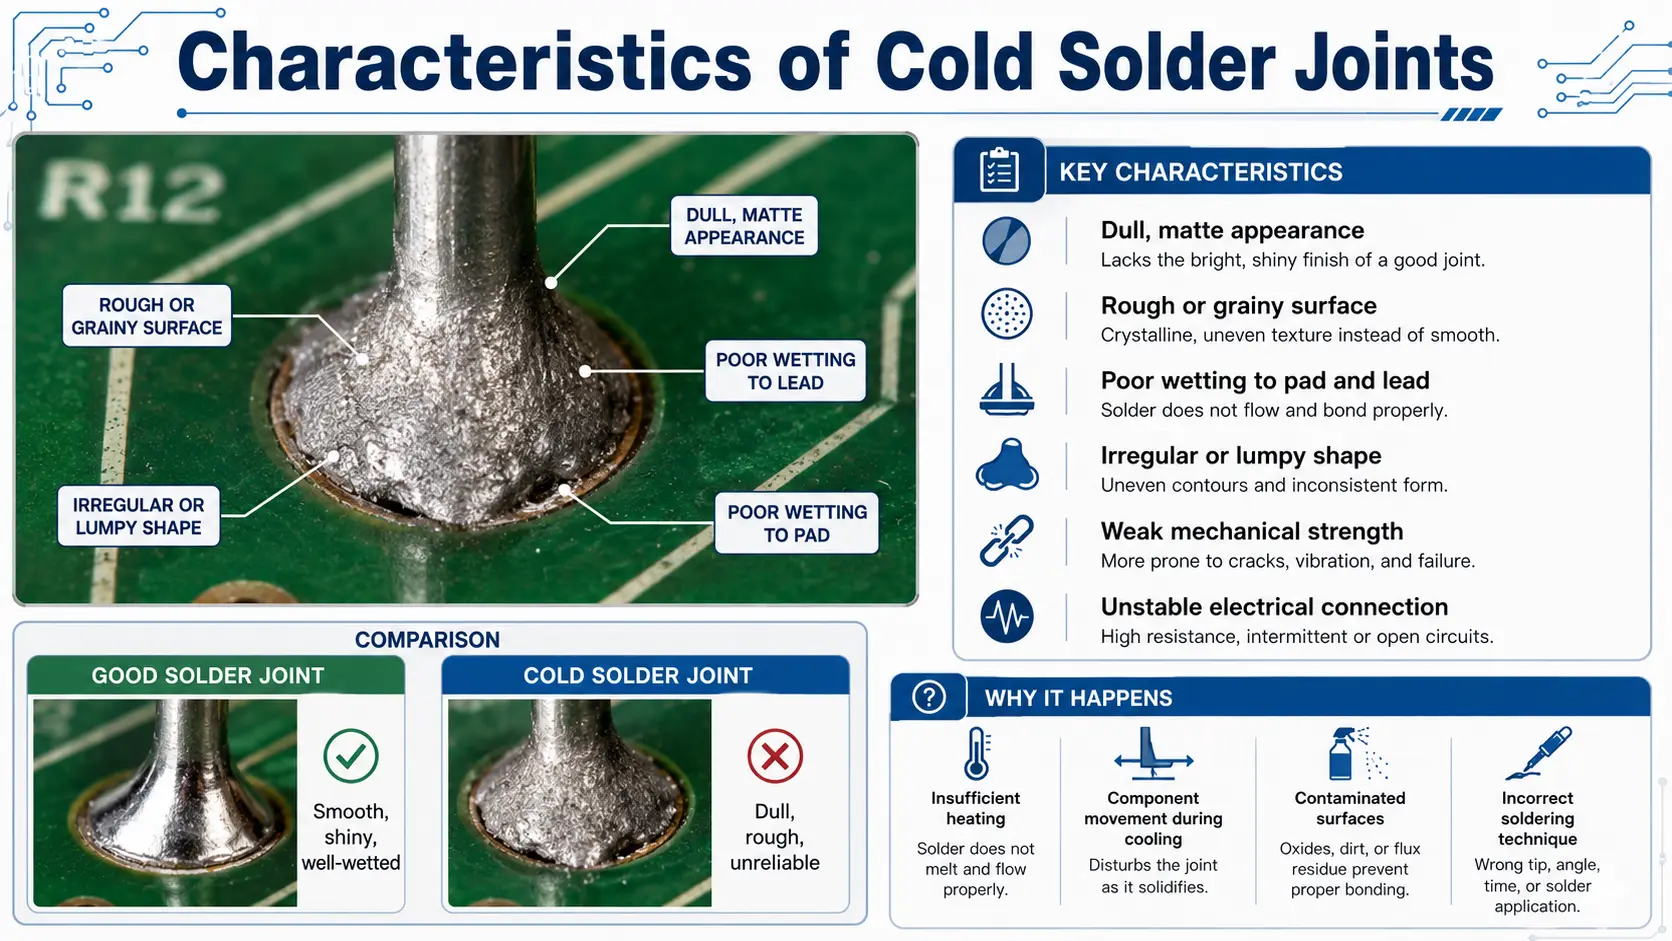
Understanding the characteristics of cold solder joints is vital to identifying cold solder joints before catastrophic failure.
- Dull, Grainy, Irregular Appearance: A good solder joint is shiny and smooth, while a cold solder joint appears dull or rough.
- Partial Wetting: Solder does not flow around the joint, creating gaps or bead-like features—an indicator of poor heat transfer or contaminants.
- Cracks and Voids: The surface of a cold solder joint may display spider-web cracks or crater-like voids—classic cold joint symptoms.
- Weak Mechanical Bond: Gentle pressure can sometimes move the component lead, revealing a weak and unreliable solder connection.
A cold solder joint may reveal itself only with enough vibration, flex, or thermal change. This is why identifying cold solder joints goes well beyond simple visual inspection and often includes mechanical or electrical stress tests.
Types of Cold Solder Joints
There are several types of cold solder joints, each caused by specific issues in technique or environment:
| Type | Appearance | Primary Cause | Example Scenario |
| Classic Cold Solder | Dull, irregular | Insufficient iron temp, rushed work | Lead-free solder used with low temp tip |
| Cracked Solder Joint | Fine fissures | Movement during cooling, vibration | Heavy connectors flexed post-soldering |
| Dry Solder Joint | Sandy, porous | Pad or lead oxidation, inadequate flux | Solder wire too old, surface not prepped |
| Solder Bridges | Unwanted puddles | Too much solder or misapplied heat | SMD reflow with excessive solder paste |
A cold solder junction will often fall into the “classic” or “cracked” categories, though all are considered weak solder conditions in professional electronics work.
Effects of Cold Solder Joints
The effects of cold solder joints extend far beyond mechanical instability—they are a leading cause of random electronics failure.
- High Resistance: A cold solder connection result in high resistance, heat, and unreliable current flow.
- Intermittent Failures: The device may function only when the PCB is flex, tapped, or under certain temperature.
- Signal Degradation: In digital circuit, effect of cold solder include increase electrical noise, lost data, or communication error.
- Long-Term Catastrophic Failure: Over time, the repeat thermal and mechanical stress make the cold solder joint worsen, lead to permanent disconnection.
What Are the Causes of Cold Solder Joints?

The cause of cold solder joints are root in technique, material, and environment:
- Insufficient Heat: If the soldering iron temperature is too low or the tip is too small, the solder do not melt completely. The formation of cold solder joint often stem from using an under power, unregulated
- Poor Cleaning and Oxidation: Dust, oil, and oxidation prevent proper solder adhesion. Always clean PCB pad and lead to avoid cold solder joint formation.
- Wrong or Old Solder Alloy: Low-quality solder or using the incorrect type of solder for your application increase the risk of cold solder.
- Component Movement: If component move as the solder cool, a cracked solder joint or classic cold joint occur.
- Insufficient Solder or Flux: Not enough solder or flux result in poor solder flow and a dry, unreliable solder connection.
Root Causes of Cold Solder and Contributing Factors
The root causes of cold solder boil down to improper heat management, inadequate preparation, and choosing the wrong material.
Key Contributor
- Old, Contaminate, or OxidizeSolder Wire: Always use fresh, high-quality solder wire; to avoid low quality solder brand.
- Humidity and Poor Environment: Soldering in a damp, dusty, or poorly ventilate workspace dramatically raise the risk for cold solder.
- Large Ground Planes/Heavy Component: Heat sink or wide PCB trace increase the risk for cold solder joint, as they absorb heat quickly, prevent the solder from reaching a full, uniform molten state.
- Wrong Solder Alloy or Flux: Using a lead-free solder alloy instead of traditional tin-lead solder require higher iron temperature for proper solder flow. Choose incompatible or weak flux will result at inadequate solder adhesion, leading to cold solder.
- Poor Solder Application Technique: Applying too little or too much solder, or focusing heat on the solder instead of the joint, will cause the solder to ball up or fail to wet—classic cold solder junction symptom.
- Timing Error: Remove the iron before the solder melt complete, or jostling the joint before it to cool, create crack and void typical of a cold solder joint.
Optimal Soldering Iron Temperature for Preventing Cold Solder
A temperature-control soldering iron is the primary defense when you want to prevent cold solder and achieve a good solder joint. Always check the melt point of the solder in use—lead-free solder alloy, now prevalent in RoHS-compliant PCB assembly, demand even higher temperature for proper soldering.
Temperature Table for Solder Alloys
| Type of Solder | Recommended Iron Temp | Melting Point (°C) | Notes |
| 60/40 Tin-Lead Solder | 330–350°C | 183 | Best for beginners and repair (soft, good wetting) |
| SAC305 Lead-free Solder | 360–400°C | 217 | Use a lead-free solder alloy for modern electronic |
| Silver-bearing Solder Alloy | 345–375°C | 221–232 | Higher strength, used for high-vibration environment |
Choosing the Right Flux Type for Preventing Cold Solder
Flux is the unsung hero in every strong solder joint. It remove oxide, help solder flow, and is critical in preventing cold solder joint.
Types of Flux for Soldering
| Flux Type | Cleaning Require | Best Use | Strength |
| Rosin Flux | Sometime | General electronic, through-hole solder | High |
| Water-Soluble Flux | Yes (must wash) | Mission-critical, dense PCB solder joint | Very high |
| No-Clean Flux | No | SMD, fine-pitch, rework, repair | Moderate (less residue) |
- Rosin flux is excellent where you want strong cleaning, but may require post-process cleaning to avoid corrosion.
- No-clean flux is suitable for modern, small-format PCB soldering and touch-up in cold soldering repair.
- For high-reliability application, water-soluble flux provide the best removal of contaminant.
Essential Tools for Preventing Cold Solder Joint
Quality tool are crucial in avoiding cold solder and ensuring high-quality solder work:
- Temperature-Control Soldering Iron: Prevent temperature drop that cause a cold solder joint to form.
- Assorted Iron Tips: Used fine tip for SMD and larger chisel tip for connector or ground plane.
- Quality Solder Wire: Fresh with high-grade solder wire (such as lead-free SAC305 or simple 60/40) boost solder adhesion and prevent cold joint condition.
- Flux Pens and Syringes: For target solder application, crucial for cold soldering rework.
- Cleaning Brush and Isopropyl Alcohol: To keep PCB and component lead spotless before solder.
- Desoldering Pumps/Wick: For correct excess solder or remove poor solder joint.
The Basics of Soldering for Good Joint

Mastering basic soldering is key to avoiding cold solder joint symptom and ensuring safe, robust PCB solder joint.
Basic Step for a Good Solder Joint:
- Clean and Prepare: Wipe the PCB pad and component lead with alcohol. Dirty surfaces always lead to poor solder joint.
- Use Just Enough Solder: The correct amount of solder should cover the pad, form a smooth curve, and not ball up or spill over.
- Heat the Joint: Touch the tip to both the pad and lead; after 1–2 second, bring the solder wire to the joint—not the tip—until the solder flow.
- Let It Cool Naturally: Do not move the joint as it cool. Movement lead to a crack solder joint or cold junction.
Mastering Soldering Techniques to Avoid Cold Solder Joints
Solder technique is what separate a strong, last solder joint from a cold soldering disaster.
- Pre-tin the Tip: Always start with a layer with fresh, molten solder on your tip for optimal heat transfer.
- Don’t Rush: Allow the solder to flow fully. Rushing is a primary cause of cold solder!
- Use Sufficient Flux: Additional flux during repair or when solder flow appear weak can prevent cold solder connection.
- Avoid Overheating: Too much solder or heat can damage the pad or create solder bridge. Practice moderation.
Detection and Testing: How to Identify Cold Solder Joints
Identifying cold solder joints goes beyond just eyeballing the board. You must combine visual, mechanical, and electrical tests for reliable detection.
Visual Signs of Cold Solder Joints
- Dull, non-glossy, or “grainy” finish
- Solder bead instead of concave fillet
- Voids, pits, or visible cracks
- Solder does not flow around the joint
Mechanical and Electrical Methods
- Flex the board gent; if the device flicker, the joint is likely cold.
- Use a multimeter in continuity mode to detect cold solder joints—high resistance or intermittent connection are red flag.
Using a Multimeter to Test Solder Joints
A multimeter is your best friend for troubleshooting and identifying cold solder joint:
- Continuity Test: Place probe on either side of the target solder joint; a beep indicate a good connection. No beep = possible cold soldering.
- Resistance Test: Set to low-ohm mode and check the joint. High or fluctuating resistance suggest a cold solder connection.
Advanced Testing Methods for Solder Joints
In mission-critical application (medical, aerospace, automotive), advanced diagnostics surpass basic inspection:
- X-ray and Thermal Imaging machine: These method spot void and heat transfer failure behind hidden cold solder junction.
- Thermal Cycling: Repeated heating and cooling the board can reveal a weak solder connection or a classic cold joint.
How to Fix or Repair a Cold Solder Joint
Repairing cold solder joint is straightforward and essential in electronics maintenance:
- Desolder the Old Joint: Use a pump or braid to remove the weak solder condition.
- Clean Thoroughly: Remove corrosion and remaining solder with a brush and alcohol.
- Apply Fresh Flux: Ensure the pad and lead are ready for quality solder adhesion.
- Solder Correctly: Heat both pad and lead, melt the solder wire against the joint, ensuring the solder flows naturally.
- Inspect and Test: Visual check and multimeter confirmation for strong continuity.
Best Ways to Prevent Cold Solder Joints
To prevent cold solder joint, smart preparation and technique are essential:
- Always clean pad and leads before starting.
- Use correct temperature for each solder alloy, especially for lead-free solder.
- Employ quality solder wire and flux.
- Secure component to avoid movement while the solder cool.
- Regularly inspect each solder connection for gloss and shape.
Characteristics of the Ideal Solder Joint
The ideal solder joint (or good solder joint) is:
- Bright, smooth, and concave, indicating excellent wetting.
- Completely cover the pad and lead, with even solder flow.
- Free from void, crack, and excess solder.
- Mechanically robust and electrically reliable.
Common Mistakes and How to Avoid Cold Solder Joints

Proper solder application is crucial. Many soldering problem stem from avoidable error that can easily lead to cold solder joint. Below are prevalent mistake and how to correct them in your PCB soldering workflow:
- Using a Low-Quality Solder Alloy: Poor solder, such as old or contaminated solder wire, increase the risk of cold soldering. Always select high-quality solder appropriate for your pcb application, whether you use lead-free solder alloy or traditional tin-lead. If a solder joint fails during test, check your material first.
- Applying Excess Solder: Too much solder collect around the joint, making it difficult to judge if the solder melt completely and flow between the pad and lead. Excess solder can also form solder bridge—unintended connection that short-circuit PCB trace.
- Insufficient Solder or Flux: Insufficient solder prevent the solder from fully wetting and covering the joint. Likewise, a lack of flux can create a dry appearance, as the solder does not melt properly or bond to the metal surface.
- Incorrect Heat Application: Failing to heat the joint evenly, not waiting until the solder melts entirely, or applying heat to the solder instead of the lead and pad—any of these will cause a cold joint.
- Moving Components Before Cooling: A classic mistake: moving or adjusting a component before the solder solidifies often lead to a crack solder joint and a weak, unreliable solder connection.
- Ignoring Lead-Free Requirements: If your PCB assembly or electronics project demand lead-free solder alloy, use the prescribe higher iron temperature and compatible flux. Otherwise, a cold solder joint occur due to the higher melting point of the solder.
Quick Tips to Avoid Cold Solder Joints:
- Always clean the PCB pads and component leads.
- Let the solder melts completely, forming a glossy, concave fillet.
- Don’t overload—use just the right amount of solder for each joint.
- Wait for the solder to cool naturally before touching or moving the component.
- Regularly retin your soldering iron tip and keep it oxidation-free.
- Use a magnifier or microscope to ensure the molten solder wraps fully around the joint.
Frequently Asked Question About Cold Solder Joints
Q1: What is a cold solder joint and why does a cold joint fail?
A cold solder joint is a solder connection that forms when the solder does not melt completely, causing a grainy, cracked, or dull appearance and unreliable conductivity. The joint may intermittently conduct or fail during vibration or temperature swings.
Q2: How can I identify a cold solder joint on my PCB?
Identifying cold solder joints typically involves visual inspection for dullness, cracks, or balling, mechanical probing for loose leads, and multimeter continuity testing to check if solder joints can be detected by high or erratic resistance.
Q3: What are the causes of cold solder in lead-free PCB assembly?
Common causes of cold solder joints with lead-free solder: insufficient soldering iron temperature, poor flux or incompatible flux types, and premature movement during cooling.
Q4: How do I repair a cold solder junction?
Repairing cold solder is straightforward:
- Remove the excess solder with a pump or braid.
- Clean the surfaces.
- Add flux and fresh solder.
- Heat the joint until the solder flow completes naturally.
Q5: How do I prevent cold solder when using solder paste for SMT assemblies?
Apply the right amount of solder paste, ensure a uniform reflow oven profile, and allow for gradual cooling. Always double-check for flux compatibility with your solder alloy to ensure strong solder adhesion.
Final Tips for Consistent Soldering Success
- Always use the right type of solder: Matching the solder alloy and flux to your PCB materials and design is critical for avoiding cold solder joints and other poor solder issues.
- Practice heat management: Use a temperature-controlled iron, and heat the joint—not just the solder wire. Solder application should be deliberate and controlled.
- Regularly check your tools and workspace: Dirty, oxidized soldering tips or contaminated solder can easily lead to cold soldering failures.
- Integrate inspection and electrical testing: Test the joint both visually and electrically to ensure no cold solder joint may have formed during assembly.
- Keep learning and improving: The more you solder, the less likely you are to fall victim to the classic pitfalls that lead to cold joints or weak solder conditions.
Conclusion: Key Takeaways About Cold Solder Joints
Cold solder joints remain one of the most preventable, yet commonly overlooked, causes of electronics defect and PCB solder joint failure. Whether you’re working on a hobby project, repairing vintage gear, or overseeing professional PCB fabrication, a single cold solder joint can jeopardize your entire circuit.
Remember:
- Cold soldering is characterized by dull, non-uniform, cracked, or grainy solder connections caused by insufficient heat, poor flux, movement during cooling, or wrong solder alloy choice.
- Use quality solder wire, follow correct solder application methods, and always heat both the lead and pad until solder flow is complete.
- Regular inspection and prompt repairs are your best tools to spot and avoid cold solder joints before they cause device failure.
- Always consult component and solder datasheets to know the melting point of the solder and adapt your soldering iron temperature accordingly.
By following the expert tips and techniques laid out in this guide, you can consistently prevent cold solder, avoid cold solder junctions, and ensure every solder connection on your PCB is mechanically sound and electrically reliable.